May 26, 2011

Trash to Treasure

I am so excited to share this post.  I have been working very hard on this project mainly because it took a lot of measuring and trial and error to get things to fit. 

I have never been dumpster diving before.  The other morning my neighbors around the corner had put this big clock in the trash.  I ran home to tell my husband to please go back to their trash and take it out before the trash truck got there, no matter what condition it was in.  He did it.  Here is what it looked like.


It was an outside clock so the sun had dried out the paper so much, it was cracking and just crumbled when I touched it.  The frame is metal and was so rusty I wondered it I could save it at all.  I looked at it for two days trying to decide what to do.  I took it all apart and used Lime Away and sand paper to remove layers of rust.  It cleaned up really nice.

I love thehouseofsmiths blog.  If you haven't seen it go look at it.  A few posts ago, Shelley made a large subway art address board and I loved it.  I have been wanting to make some kind of subway art for awhile.  This would work.  Thank you Shelley for the inspiration.

I took a piece of bead board and cut a 17 inch circle and sanded, painted, and sanded some more until I got the look I wanted.  Then I spray painted the frame and sanded it just a little.  Not to much.  I worked all day trying to fit words, and think of things that represented our family.  I had to cut and re cut to make things fit, plus I'm new at the Cricut.  Here is what I came up with.


I love it.  I mod podged the words to the bead board and put it all back together.  My first SUBWAY art and it cost $0.00 dollars.  I don't know if I should tell my neighbors or not!  These words represent something about each person in our family and what we are about. 


Linking to:                        mysimplehomelife
                                        commonground
                                        chiconashoestringdecorating
                                        romantichome
                                        pinkpostcard
                                        bystephanielynn
                                        iheartnaptime
                                       debbie-debbiedoos


May 25, 2011

Number Tags

I love tags.  They are popular and there are so many creative ways to make them.  I have seen jar lids, buttons, soda caps, burlap tags....so many cute ones.  So this is not a new idea, just another surface to display a number.


These are 4 inch coasters for potted plants that I found at Walmart for .99 cents each.  I liked the cork board texture and thought these would make a cute number tag.

I got out my distressed ink pad and aged them up a bit.


Then I used my Cricut to make my 3 1/2 inch number and used that as my template.  I took some turquoise paint and painted on the number.  Then I found an earring that I have lost the match to and stuck it right in the cork.


I used a picture hook and poked it into the cork and added a drop of E6000 just to hold it securely in the cork and added a chain.  Voila!  A simple number tag.


One thing I have learned about taking pictures is that you should never shoot directly into a window.  This corner of the room has side by side windows.  When I closed the blinds, it was too dark.  When I opened them a tad, it was too bright.  Sorry for the exposure on this picture.  I'm still learning and practicing with photography and this was the best out of all of them.


May 24, 2011

Baby bird update

Our babies are growing by leaps and bounds.  They barely fit in the nest now.  I know they look like a jumbled mess of feathers and I'm not even sure I can figure out exactly what is what, but here they are.  That is three babies in there and it's cold here today so we want to hurry so mom can come back and keep them warm.


Monday, May 23rd


May 23, 2011

My 100th Follower


In honor of my 100th follower, I would first like to say Thank You to all of you.  Blogging has become a love of mine and I am so glad that I have met so many great people with creative, talented, extraordinary skills.  I love all of the recipes, decorating, crafts and inspirational ideas I see daily.  It helps make our house more of a home each day. 

I would like to thank Debbie at Refresh Restyle for being my 100th follower.  She has a beautiful blog and a very cute dog named Murphy who has a lot to say in his own awesome posts.  Here are just a couple of posts from Debbie.  Please go to her blog and follow along with her.  She has so many inspiring pictures and a fantastic decorating style and an eye for beautiful things.  


Strawberry Mango Salsa

I think I've mentioned before how much I love strawberries.  So fresh, sweet, juicy and delicious on everything.  With spring here what better way to eat strawberries then in a refreshing healthy salsa.  I have never been a huge fan of mango's but this is one way that I WILL eat them.  This is simple with 4 ingredients.

2 cups cubed mango
2 cups cubed strawberries
1 cup red onion
Cilantro

Mix this together and enjoy with tortilla chips.  Nothing fancy, just plain delicious goodness.


Linking up to:               debbie-debbiedoos.blogspot.com
                                    http://www.peasandcrayons.com/
                                    http://diybydesign.blogspot.com/
                                    http://www.remodelaholic.com/

White Pizza Dip

I was looking in my archives and realized that I have so many good recipes no one was looking at because my blog was brand new.  I decided to dig out a few of my favorites and repost because they are delicious.


My house smells like a Pizzeria!


This recipe is on the back of the box!


1-1/2 oz. pkg. herb with garlic soup mix
8 oz. container sour cream
8-oz. container ricotta cheese
1 cup shredded mozzarella cheese
1/4 cup chopped pepperoni
1-lb. loaf Italian bread, cubed

Combine all ingredients, except bread, in an un-greased 1 1/2 quart casserole dish.  Bake at 350 degrees for 30 minutes.  Serve with bread cubes.

Print Recipe

May 17, 2011

Thrift Store Finds

Today in Southern California it is raining and cold.  I decided to head to the thrift store and see what I could find.  IT WAS A GOOD DAY.


First of all I found this....It is a broken clock.  It could probably be easily fixed, but I wanted to use it as a tray for this table.  I removed the hands - but kept them because they are rusty and awesome so I will figure out something to do with them.  This cost me $10.00.


I might rearrange things on it, but for now, I am using as it.  It is awesome and big and old and perfect.


Then I found this......squeal of delight!

This is about 3 feet high.  It is heavy metal.  I have no idea exactly what I will put on it right now, but I walked around the store and kept looking at it.  It cost me $29.00.  I knew if I walked out without it, I would kick myself.  It is soooo cool.  They had a bigger one for $50.00, but that is way out of my budget.  Thirty dollars is on the high side, but our thrift stores price everything high because they know the people like me are out there.  Maybe it could be an awesome cupcake stand for a church event, party, or even wedding reception. 

And lastly, I found these......


These cute little mirrors were .75cents each.  They were half price.  They are also very heavy and I don't think I will have to change a thing on them. 

See what the rain does......it makes me go shopping.  Oh, and I bought a cookbook, so now I will go enjoy the rain and look at my new cookbook that cost $3.00.


                                                       Linking to:  http://diybydesign.blogspot.com/
                                                                        Follow Me Wednesday
                                                                        http://www.lilluna.com/

Corn on the Cobb with Lime Chive Butter

Two of my favorite things to eat that just scream summer are Strawberries and Corn on the Cobb.  I love both of them.

When I moved to California years ago, I discovered the ultimate way to eat corn on the cob.  This might gross some of you out, it did me at first, until I finally tried it and found out how delicious it is.  Ready?????

Every summer families from church would have a big bon fire during the summer at the beach.  Everyone brings stock pots for corn on the cobb.  You take your pot and go out to the ocean and fill it will salty, ocean water.  Bring it back to the fire and get it boiling.  Husk your corn and remove all the little strings, then put the husk back around it.  Place as many as you can get into the boiling sandy ocean water.  When the corn is done, it is flavored perfectly, and all the sand stays in the bottom of the pot and you don't get one bit on your corn.  IT IS DELICIOUS!  It took me a couple years to try it, because believe me, I know what goes on in the ocean, but once I tried it I was hooked.  Maybe it's just the atmosphere that makes this corn taste so good.  It is juicey, salty, and if you put a little butter on it....pure heaven.

My recipe for today is made with grilled or even boiled on the stove corn.  After it is cooked, lather it in this lime chive butter, or you can cut it off the ear and mix the butter in the bowl.   Either way, this is a delicious way to eat corn.


Lime Chive Butter -
1/2 cup unsalted butter, room temperature
1/3 cup finely chopped fresh chives
2 tsp. fresh lime juice
1 tsp. finely grated lime peel
1/2 tsp. fine sea salt
1/4 tsp. sweet paprika
Pinch of cayenne pepper

Mix first 7 ingredients in medium bowl.  Cover and chill.  Bring to room temp before using.

I mixed my butter - then wrapped it in wax paper and shaped it into a stick of butter again.  I kept it in the refrigerator for about 4 days until I finally bought the corn.  It was delicious.


May 15, 2011

Cookie Dough Brownie

Original recipe from Food Folks and Fun

Very easy and very popular brownie/cookie!
The best thing about the cookie dough is that no eggs are used - so no worries.
I made this big batch for our baseball team and I kid you not, the boys devoured these in less than 5 minutes.  There wasn't a crumb to be found.


For Brownie Layer:
1 box of brownie mix (family size).  Bake as directed.

For the Cookie Dough Layer:
3/4 cup salted butter, room temperature
3/4 cup brown sugar
1/3 cup granulated sugar
1/2 tsp. vanilla
2 1/2 tbls. milk
1 1/2 cup flour
1 cup chocolate chips

Make the brownies according to directions on the box and bake as directed.  Let cool.


To make the cookie dough, cream together the butter, brown sugar, granulated sugar and vanilla until light and fluffy.  Beat in milk.  Add in the flour and mix until combined.  Stir in Chocolate chips.

Once brownies have completely cooled spread the cookie dough on top.  Place in freezer for 20-30 minutes or in refrigerator for several hours to set.


Print Recipe


Linking up at:                        http://debbie-debbiedoos.blogspot.com/
                                            http://sumossweetstuff.blogspot.com/
                                            http://thediyshowoff.blogspot.com/
                                            http://craftskeepmesane.blogspot.com/
                                            http://www.wellseasonedlife.com/
                                            http://www.myuncommonsliceofsuburbia.com/p/houzz.html
                                            http://www.remodelaholic.com/
                                           

May 14, 2011

Best Ritz Cracker You Will Ever Eat

I need to think of a better name for these delicious cookies.  They remind you of a butterfinger, or twix bar.  No one will ever know it is a Ritz Cracker in the middle.


1/2 cup marshmallow cream
1/2 cup peanut butter
48 Ritz Crackers
1 1/4 cups semisweet chocolate chips, melted ( I don't like using choc. chips.  I prefer any melting chocolate such as choc bark, or Candy Quick).
1 cup flaked coconut or chopped nuts ( I use both seperately)


Spread about 1 teaspoon peanut butter on 24 of the Ritz crackers.  Spread 1 teaspoon Marshmallow Creme on remaining crackers.


Sandwich crackers together, using one peanut butter and one marshmallow.  Tip: Set in freezer for approximately 10 - 15 minutes.  This helps the marshmallow cream harden before dipping in the chocolate.  Then dip in melted chocolate or white chocolate (almond bark), and roll in coconut or finely chopped nuts to coat.


Set crackers on waxed paper and let stand until chocolate sets.  Store in air-tight container for up to one week.  Makes 24

May 12, 2011

Rhubarb Bread

I love Rhubarb.  My grandma use to make Mulberry and Rhubarb pie every spring.  It was delicious.  They lived on a farm, and along one of the fences in the fields were Mulberry bushes.  We would pick and eat them all day long.  They were so sweet and juicy.

Grandma would take these berries along with Rhubarb and her perfect pie crusts with Lard, and make delicious pies.  I remember exactly how they tasted.  If you have never tasted Rhubarb, it is very tart, but with the help of sugar it sweetens it just enough, but still keep the tartness.

Rhubarb is seasonal and springtime is when it is ready.  The stores have it, but it is almost $5.00 a pound.  Man, I wish I had a garden about now.  I bought a pound anyway because I wanted to make this bread and am so glad I did.  This is delicious!


1 cup milk
1 tbls. lemon juice
1 tsp. vanilla extract
1 1/2 cups brown sugar
2/3 cup vegetable oil
1 egg
2 1/2 cups all purpose flour
1 tsp. salt
1 tsp. baking soda
1 1/2 cups chopped rhubarb

Topping
1/2 cup brown sugar
1 tsp. ground cinnamon
3 tbls. butter, melted
1/2 cup oatmeal

Preheat oven to 325 degrees.  Lightly grease two 9x5 inch loaf pans.  In a small bowl, stir together milk, lemon juice and vanilla; let stand for 10 minutes.

In a large bowl, mix together 1 1/2 cups brown sugar, oil and egg.  Combine flour, salt and baking soda, stir into sugar mixture alternately with the milk mixture just until combined.  Fold in rhubarb.  Pour batter into prepared loaf pans.

In a small bowl, combine topping ingredients.  Sprinkle over the unbaked loaves.

Bake in a preheated oven for 40 minutes, until a toothpick inserted into center comes out clean.


Linking up at:                                     http://www.momtrends.com/
                                                         http://www.ekatskitchen.com/

May 6, 2011

Nest Art

My daughter and I were out in the front yard two nights ago and we found this perfect little nest under our palm trees.  It was just sitting on the ground.   (Sorry, nest obsessed).  It is such a masterpiece of art.  I find them fascinating and intricately made.  I took this nest and put it in the garage for a couple days, to make sure there are no critters or bugs in it.  Believe me, there are none.  I sprayed it with regular bug spray and let it sit for a couple days. It looks freshly made on the inside and there was no mess of any kind.

I took a black frame and painted it pink.  Sanded down the edges, added a piece of cream burlap to my frame back and stuck the nest on with a push pin.  I hung it in the downstairs bathroom on an empty wall.  This is the first "pink" anything I have ever had in my house.  I think I've started something new and I like it.  It's hard to tell, but my walls are a blue/gray so the pink looks pretty against it.


Just look at the way this was made.  Awesome!  The eggs are fake.


May 5, 2011

Bird Nest Update

Well, we couldn't resist not peeking into our little nests, so when the bird flew away for a minute, my husband got on top of the patio cover and took a couple pictures.  We have two nests.  One above each outdoor fan.  Here is a picture of our little stay at home mom and her little nest.  She sits on it all day and all night.  Look at these beautiful little eggs.


Now the second nest (if you can call it that), looks complete from below, but when my husband looked into that one......here is what we found. 


Want my explanation?  I think it got confused which nest the other eggs were in, and she needed to lay that egg fast and just plopped it out right on the wood beam.  We laughed our heads off.  The sad thing is, she has abandoned this egg all together.  She never sits on that side so I'm afraid that egg won't ever hatch.  It still makes me laugh to look at that nest though.

Happy Spring and have a great Mother's Day everyone!


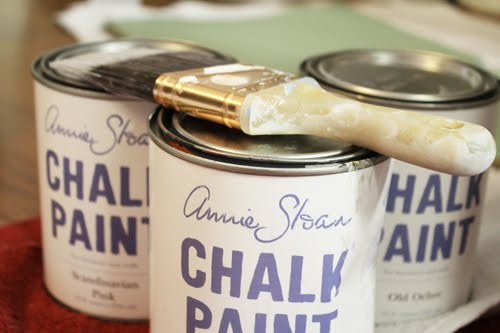
Chalk Paint

A GIVE AWAY AT debbiedoos


MY chalk paint giveaway


Debbie over at debbiedoos is having a "give away" that ends on May 10th for this awesome paint.  Go to her site and read all about it.  I did some research and the most exciting thing about this for me, is that if you have a piece of furniture that has a thousand coats of varnish, sealant, etc.  you can paint right over it with this paint.  Debbie has been raving about this paint and swears by it.  I really want to try it.  I'm in love with the creamy yellow color she painted a dresser and the duck egg blue is beautiful.

My kitchen table is screaming at me every day to be painted and I think this paint would be perfect.  I'm entering in the give away and urge you to go to her site and enter.  You only have to be a follower and she is full of ideas and link parties and a beautiful home.  Plus, she's famous and has been issued in a magazine.  I visit her site almost every day.  Very inspiring.